8.30.2018

Starbuck (Kara Thrace) Walk-Through

As soon as I started watching this series, Starbuck became my favorite. This outfit is fairly simple, especially if you've already tackled Samantha Carter from 'Stargate SG-1'.


First, you've got the recognizable double tank top. There's more than one place to get them, I got mine from Anovos.com (about$65), however, they might currently be out of stock. The two pieces are seperate and the darker layer is somewhat an olive color.


For the pants, I just took my olive drab BDU's from Carter. In BSG, they have more material between the belt loops but I left mine off for now. All it would take is to get the same material as the pants and cut and sew some rectangular pieces, or if you bought the BDU shirt with extra pockets you can use the material from the pockets when you take them off. Other than that, you don't need to do anything to them. Here's the link to my first post on the BDU pants: http://warriorclassstudios.blogspot.com/2015/02/sg-1-bdu-pants.html

Speaking of the BDU shirt and its pockets, I got the same one for Starbuck as I did Carter. From Propper.com ($30) The crew has two pockets so I got the one with two, but if you'd like to add material to the belt loops, you can get the four pocket and take them off as the material of the shirt is the same for the pants. Couple reasons I didn't use Carter's shirt for this cosplay- we are going to be sewing on suede to the shoulders, Carter's BDU shirt has velcro sewn on, and on 'Stargate' they switched all the buttons on the shirt to the other side (for the females). On BSG, they left all the buttons on the same side, so no switching needed!


I wasn't too picky about the boots. I, again, just used the ones I use for Carter. If I ever get around to making the flight suit, then I'd try to come up with these boots they used for that outfit:


For the dog tag, you can get it many places. I got mine from Amazon for about $13.


For the utility belt and holster and all the little pouches, I got them in a bundle from Anovos, but I'm not sure if they sell them anymore. I'm sure there are other places to get them, but they're not absolutely necessary to complete the outfit.


Included is a left and right holster, the belt, and six separate pouches (one is a double). Some of them I also used for my Jill Valentine cosplay.


I got the 'Battlestar Galactica BSG 75 Screen Version Fully Embroidered Uniform' patch (3.5") from scifigeeks.com for $12. The similar one (which I think they did use on the show at least for part of it) has gold material for the gold color, but I think this one looks better. This one is going on the left shoulder of the BDU shirt.


Here's mine^
You can also get the 'Battlestar Galactica Viper Pilot' 4" patch there as well:


The two viper wing pins I got from eBay.com. I got the set that came with the two captain rank pins (the diamonds with two lines) and one viper pilot (for when I get around to the flight suit). One goes on each corner of the collar. The back is not a regular pin point, it was actually a tiny, tiny cylinder that the back screws onto, so I had to work to get it through the material, but that thing is not coming off so that's good.


Starbuck's wing tattoo doesn't show up until later in the series but I got mine at Anovos for $20. Don't think they sell them anymore at the moment but there's other places like etsy that might have it.


Pew pew pew.

The gun I got from this artist who makes replicas, however, I don't think he is still making them. :( 


But you can find more replicas from these guys (as well as others)! This is a three-piece kit that I easily put together with JB Weld glue. A little paint, detail, and scuffing and they work great. While the guns from both of these places both fit in the holsters from Anovos, they do differ slightly in size and proportion. Not an issue but something to be aware of. 


The other little details you can add are her sunglasses, a cigar, and the ring she wears on her thumb.


~Next post will include details on how to add the suede and patch to the shoulders as well as the nylon straps and buckles to the pockets and wrist cuffs!


Adama: 'Captain Adama and Colonel Tigh are working on the plan now and I need some serious "out-of-the-box" thinking.'

Starbuck: '"Out-of-the-box" is where I live.'


So Say We All


{WarriorClassStudios}

4.28.2018

Ashley Hammond (Yellow Space Ranger) Walk-Through Part 2

Ashley Hammond Costume Part 2

Jacket Modifications:


The jackets are cropped so that the bottom edge sits right at the belt or right around the natural waistline. This was tricky figuring out how to do it as I've never cropped clothing before, but with a couple trials and re-pinning I finally got the placement I wanted.

First, I took my grey BDU shirt and took off the two front pockets by carefully unstitching them (no cutting). 
Next, I folded under the two front panels- left and right sides of the opening near the buttons that go down the front, and pinned them. I also folded under the front parts of the collar that have the button and hole on them. I had to pin and re-pin A LOT as I worked to fold the bottom portion under as well to get the cropped look. I didn't actually make any cuts, I just folded everything into place and had to adjust and re-adjust many times to get all the parts where I wanted them to be.


With the pins in and having already put it on to make sure it would fit right, I sewed down the front two panels to start.


The collar was tricky. I folded just to make sure it sat flat and still 'flowed' with the two front panels (nothing pulling too much on each other or bunching up). I didn't make any cuts, just folded it over itself and brought it even with the outside/bottom edge of the collar.


The backside just got folded upwards over on itself and lined up with the edge of the panel going down.


On both sides. Just left the button on and sewed around it.


Next, I sewed up the front panels again, but this time going up the other side of the part that was folded under, so that both sides on each panel would be sewed in place. And I continued to sew up to the collar ^ to get the inside down, and met at the bottom of the collar on the outside>


Little confusing but I hope the pictures help. As always, questions are welcome.

The jackets for the guys had a bit more length at the bottom than the girls. I got it as close as I could and pinned everything before sewing.


Mine is slightly different but I liked it anyway. I lined up the two vertical seam lines on the back sides so that the material wouldn't bunch up at any point as it goes around the back. If you feel more comfortable cutting and then hemming, then go for it! This was easier for me.


Make sure this^ panel that goes around is able to lift up and is only sewn at the top. I sewed it together all the way around the back.


I left the cuffs of the sleeves alone as well as the tops of the shoulders (not sure the name) because it just looked more 'military/space ship' to me.


Next, we have the PATCHES!

Again, I got mine from BrandNewLoveSong on Etsy.


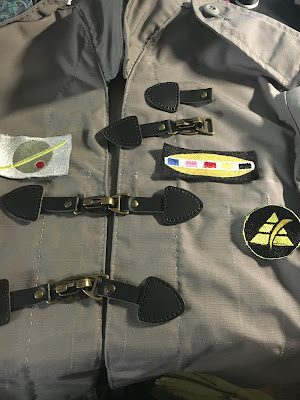
The top rectangle with each of the colors over the sun, and the pyramid with the lightning bolt go on the left side (if you're wearing it). Some pictures are flipped so I had to make sure I was putting it on the correct side of the shirt. The planet with the moon and white background (right^) goes on the right side. The blue and red circle patch goes on the right shoulder. And the big yellow rectangle goes on the back.


First, I positioned the patches where they were supposed to go on the shirt and pinned them. At the same time, I also positioned the buckles where they would be sewn on because it helped get everything in the right place and plus I'm picky.
(Also, BUCKLES:) ---Make sure to cut off the black leather from them (just 3 sets because I kept the leather on the rest of them for the boots...)


Once I had the position of everything along with the buckles, I pinned the patches, took off the buckles for now and sewed on the patches to the front. The planet with red moon is about 1 1/2" from the edge, the five colors against the sun on the top right is about 1 1/4" from the edge, and the pyramid with lightning bolt is about 2 1/4" from the edge, or centered below the one above it.


And what it looks like on the underside. I used white thread for the one on the left, black thread for the two on the right.


After those three front patches were on, I sewed on the buckles. I looked at a bunch of screen shots to get them positioned with the patches correctly. I used grey thread to match the shirt.


For the red and blue circular patch on the right shoulder, I used black thread, and centered it 2" below the top seam of the shoulder. Make sure the red color is on the top and bottom!


For the back yellow rectangle patch, I would've liked for it to be bigger but, as I couldn't find it anywhere else, I was actually fine with it.


I centered mine about 4 1/2" below the bottom seam of the collar. Pin and sew. I used black thread and just stayed on the black border.


(You can also see the back part of the hemming/cropping in this pic)

Finally, the buckles on the boots. I did something a little different than what they actually look like not he show. I'm still not sure if I like it but either way this is how I did it.


I took eight pairs of buckles (four for each boot) and left the leather on. I sewed on some elastic and extra black canvas-like material so that they would kind of strap on to the boots. I folded the elastic in half and sewed it again so it would fit in the grooves on the bottom of the boots.


I think this buckle was the only one that had the canvas material. I wanted to keep the leather on because I liked the look of it. Reminded me of steampunk, but, I might still re-do it and take it off.


The buckles themselves, I just used the shoelaces and laced them in place up the boot. The elastic and canvas was to keep the leather down against the sides.


So they're removable, maybe that's what I was going for? Idk but this is how it turned out.


I'll leave them on for now but, honestly, you can cut off the leather from the buckles and lace just the buckles up the boot. I'm not sure how I did it- what pattern I used, I just messed with it a lot and finally settled on something. If I were to take the leather and elastic and canvas off and just have the buckles on the boots, I'd probably still lace them on with the shoelaces.

Hmm...I think part of why is because, when connected, the buckles don't quite sit flat on the front of the boot and this way they stay on and don't move? You want to be able to open and close the buckles  to get your foot out. It's probably my choice of boot. If you can find a pair of boots that are easy to sew onto and fit well when closed and laced and buckled, that might be the way to go.

So that's it!
I also got an Astro Blaster for a little more detail from eBay. Hard to find these days...


I hope this helped with the making of your outfit. Or maybe this was just entertaining. Either way, thanks for reading!

{WarriorClassStudios}